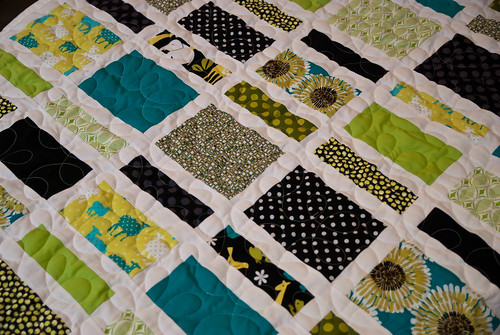
Second ever crib quilt, meant for my own little one this time!
No tutorials this round. Fat quarter fabrics are courtesy of Fabricworm, a one stop shop for Fabric awesomeness.
More images after the jump.

Sunday, October 14, 2012
Baby Girl Headband

This little headband was made for a sweet baby girl who lives roughly 3400km away. Since I had no means by which to measure her head, I had to rely on rough sizes from online tutorials. I mostly followed this fabric headband tutorial for my measurements. The flower (or yo-yo) was cute and easy to make. I will definitely use it again for future projects.
Luckily the band turned out to be a bit larger than needed, though next time I would add more fabric around the elastic than what the tutorial calls for to allow more stretch. All in all, not too shabby for my first baby headband.
Thursday, June 28, 2012
Pencil Case

This was my first time actually working with a zipper, and I thought I could get by without a zipper foot on my sewing machine, but ended up breaking a needle! Let that be a tip to other sewing newbies. As frustrating as that was, it all seemed to work out in the end.
Wednesday, June 27, 2012
Boys Messenger Bag

Far too much time has passed since I've made an update, so it's about time I catch up on projects!
What a better way to start than with an awesome messenger bag I made for my nephew. After much searching I found this tutorial for a really easy and simple design. The size was also just about right for a young boy, with enough room for a couple of books and some supplies. While I like the camouflage fabric in the tutorial, I instead used a dark olive green decor fabric, and a light green cotton for the lining.
More tips and pics after the jump.
Monday, February 27, 2012
Robot Crib Quilt

I have finally finished my first quilt! I love modern quilts and opted for a simple and less traditional pattern in order to better showcase the awesome Robot Factory fabric by Caleb Gray. These little bots are adorable, and perfect for the little guy this quilt is going to.
As this is a crib quilt, it measures roughly 3x4'in size. The top-stitch/quilted part follows the lines of each fabric block (options for this are limited without a long arm sewing machine), and the back piece is a very fine and super soft fleece.
Full quilt after the jump.
Saturday, February 11, 2012
Felt Coasters

Just for a little fun, I thought I'd try making a double layer felt coaster. The concept is pretty simple, but in practice a few things can go wrong. Felt stretches quite easily, and can go askew while being stitched or ironed. This makes it tricky to get the edges evenly lined up, and some final trimming may be needed. In this case it's a good idea to cut the pieces slightly larger than what the finished coaster would be.
YOU WILL NEED:
two felt colours (one bright and one neutral for more 'pop')
white heavy weight thread
double-sided fusible interfacing
sewing machine and iron
Full instructions after the jump
Wednesday, January 18, 2012
Door Draft Stopper

The main culprit for today is a drafty door. Until now the fix has been a haphazardly placed towel, which really isn't very effective or attractive. Foam pipe insulation stuffed into a custom made fabric sack is a much better, and far more stylish option. This door draft stopper uses two foam pipes to provide coverage on both sides of the door. It also allows the door to be opened and closed fairly easily without having to re-adjust your draft stopper. When I first saw this idea I was sold!
I found this great tutorial on flickr by not martha. I only followed the general idea, and basically winged it using my own measurements. I also opted for a thick, canvas-like fabric to minimize wear and tear.
This was quick and easy to make, used cheap materials, and best of all - it works!
More photos after the jump.
Subscribe to:
Posts (Atom)